Tuesday, 28 June 2011

Wednesday, 8 June 2011
My 3D Animation
•I based my animation on a house roam. My idea came from researching the TV series the Simpson's. I firstly made a TV that a had a short part of a Simpson's episode, i had to change this when my work got deleted, I then changed my idea into a house roam, this is where the camera will move around the house in a human movement through the rooms that I have created. I used standard primitives the simply edited some of then so I had the desired effective object I wanted. I used household appliances textures I had found on an Internet site to texture my appliances, I then got textures from the Internet to texture my wood workings( cupboards and doors) and textures to use for my walls and floors. I was not pleased with some of them because they were too unrealistic, some of most of the wallpaper textures looks to big for the wall, this is where i should have put the texture into photoshop and have made a better texture the make a better effect of wallpaper. I then began work on the furniture in the other rooms, I made these by using standard primitives and using such tools as turbo smooth found on 3Ds Max software. i had a problem with some of the textures because some of them didn't show up when I tried rendering the scene. I next used a free camera and set it to the appropriate high need to make it look eye level of a average human, I move the camera around the scene, I made the camera move by it self by using the animation bar in 3Ds Max, I used key tool to make each frame a key frame to the others, by moving the camera on each key frame it enabled the camera to move freely through the house without jerkiness, I am happy at how this went because it looked like realistic human movement. I could have created my own textures for the house and the furniture appliances. I am pleased with the overall animation as it was as I planned, the animation looked like it should as I compared it to the storyboard i used to plan it. There are some weaknesses with the animation with that there are some faults in the building itself, if i had more time I would have gone back to that and changed it so it wasn't clear to see. Overall i enjoyed this project and was a good experience into 3D animation.
Tuesday, 7 June 2011
Comic - Woody Woodpecker

 This is my concept for the comic, I researched woody woodpecker on the Internet and got some images, I then drew the images onto paper. I scan the drawings into photoshop and edited them to what my comic need them to be like.
This is one of my edited version of woody woodpecker, I have put some camo I found on the Internet and added it to the image, I edited it in photoshop.
 This is my finished comic, I used comic life to create the comic, comic life is a software which has comic style layouts, you choose a layout and then start adding images to the layout. I clicked and dragged the images I created in photoshop, in comic life there are speech bubbles and action bubbles and box for naraation, so I then added speech bubbles and narration into the comic so the reader could understand it, I also added some action bubbles for sound effects. I then put it back in photoshop and added some company logos and other banners. i changed the coulour of the comic and put it into a sepia colour.
EVALUATION
I based my comic on woody woodpecker. My idea came from researching the TV series woody woodpecker. From my mood board of images I found on the internet drew wood onto a A3 piece of paper. I scanned the images into Photoshop and then started to edit them. using a camo texture I had found on an internet site to texture woodys body, and used the paint tool to colour the rest of his figure. I then began working in Photoshop to bring 6 images together. I then downloaded a software called comic life. I used comic life to create the comic, comic life is a software which has comic style layouts, you choose a layout and then start adding images to the layout. I clicked and dragged the images I created in Photoshop, in comic life there are speech bubbles and action bubbles and box for narration, so I then added speech bubbles and narration into the comic so the reader could understand it, I also added some action bubbles for sound effects. I then put it back in Photoshop and added some company logos and other banners. I changed the colour of the comic and put it into a sepia colour. I am happy with the outcome of this comic because it looks like a modern comic.
Wednesday, 13 April 2011
Final 3D Model
 This is my first render before i deiced to change the colours.
 This is my final 3D model, I made this using 3D max.
Wednesday, 16 March 2011


Tuesday, 1 March 2011

Wednesday, 9 February 2011

Wednesday, 26 January 2011

Wednesday, 19 January 2011

Ball With Shadow Using Spotlights

Spotlights


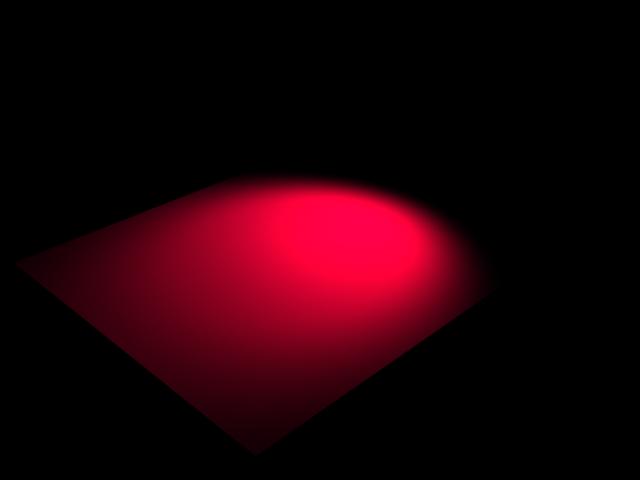
By using a spotlight tool you can make a light shine down on an object and also make it different colours.
Tuesday, 4 January 2011

Monday, 6 December 2010

Wednesday, 24 November 2010


Tuesday, 2 November 2010
Evaluation
*Does the end product match your original intentions?
My end desktop nearly matches my original design. the path that the pac-man take has turned into the map of the salts building, I have made the map on 3ds Max. I also made pac-man and the 4 ghosts on 3ds Max. I changed the Shipley college logo into a logo that suit my desktop better. overall my end product matches my original intention, however some of the object have been moved around.
*Is the end product appropriate for your intended audience – who was this – age groups, gender?
My target audience was from young school children to adults. these age ranges are suitable for this production because all these age will know what the desktop images will be about also it is not targeted to one age range. Also this desktop is for both genders because it doesn't appeal to just one. I think my final desktop is appropriate to these ages and genders because it is a popular aspect, and everyone knows what it is.
*Discuss the technical aspects of your work and highlight the strengths / areas to develop
Demonstrate your knowledge of the program [P.Shop/Flash/S.Mx] you used & include 'subject terminology
This was a strong project for me because I already had knowledge in many areas, I had already used photo shop for my photograph GCSEs and I have used Flash in IT. these two programs I'm am strong in. I also used 3ds Max which I have only just started using. however I used this in my project and it went well except from a few errors in the images.
Overall this project was successful because I had no trouble in the making of this desktop, but also I had a few reports from peers which mad my work look better.
*Discuss the content / style of your work
My style of work was to do with retro/arcade. I like playing games so I thought I would incorporate this into my product theme
**What have you learnt from this experience?Overall in this project has been a good experience of what is to come later on in the course. I have enjoyed this project and I hope there is more to come. In this experience I have learnt more photo shop skills to create a good piece of work. also I have learnt to listen to others to take advise and also to give other people advise.
My end desktop nearly matches my original design. the path that the pac-man take has turned into the map of the salts building, I have made the map on 3ds Max. I also made pac-man and the 4 ghosts on 3ds Max. I changed the Shipley college logo into a logo that suit my desktop better. overall my end product matches my original intention, however some of the object have been moved around.
*Is the end product appropriate for your intended audience – who was this – age groups, gender?
My target audience was from young school children to adults. these age ranges are suitable for this production because all these age will know what the desktop images will be about also it is not targeted to one age range. Also this desktop is for both genders because it doesn't appeal to just one. I think my final desktop is appropriate to these ages and genders because it is a popular aspect, and everyone knows what it is.
*Discuss the technical aspects of your work and highlight the strengths / areas to develop
Demonstrate your knowledge of the program [P.Shop/Flash/S.Mx] you used & include 'subject terminology
This was a strong project for me because I already had knowledge in many areas, I had already used photo shop for my photograph GCSEs and I have used Flash in IT. these two programs I'm am strong in. I also used 3ds Max which I have only just started using. however I used this in my project and it went well except from a few errors in the images.
Overall this project was successful because I had no trouble in the making of this desktop, but also I had a few reports from peers which mad my work look better.
*Discuss the content / style of your work
My style of work was to do with retro/arcade. I like playing games so I thought I would incorporate this into my product theme
**What have you learnt from this experience?Overall in this project has been a good experience of what is to come later on in the course. I have enjoyed this project and I hope there is more to come. In this experience I have learnt more photo shop skills to create a good piece of work. also I have learnt to listen to others to take advise and also to give other people advise.
Desktop New

I used a website called 1001fonts.com, this website allows you to uses over 100 fonts to make your perfect text. You choose a text font you want then type in the words what you want, you then copy and paste it into the document you are using. as above I have used a text font called arcade classic this font looks and goes well with the genre of the desktop which is retro/arcade.
I then used a brush tool to make all the background black, then used a different tool to make the yellow figures.
I then took advice from my peers, and changed the background from black with yellow figures, to yellow with a black boarder around the images.
Desktop

I used a website called 1001fonts.com, this website allows you to uses over 100 fonts to make your perfect text. You choose a text font you want then type in the words what you want, you then copy and paste it into the document you are using. as above I have used a text font called arcade classic this font looks and goes well with the genre of the desktop which is retro/arcade.
I then used a brush tool to make all the background black, then used a different tool to make the yellow figures.
Wednesday, 20 October 2010

Subscribe to:
Posts (Atom)